Last week, we got an introduction to Terraform and looked at a practical example of how we can use it to create and manage resources in Microsoft Azure Cloud. We downloaded and installed Terraform, created our main.tf file, ran it from the terminal to create a couple of resources in Azure. This week, let’s build on that learning and add a couple of other parameters in the mix:
- We have a GitHub account where we store our source code.
- We use Azure DevOps for Continuous Integration / Continuous Delivery (CI/CD) deployments.
While we can run Terraform from our client machines, in a team setup, we probably want to offload that responsibility to your CI/CD system. Today, we’ll use Azure DevOps in that regard. In terms of code storage, we’ll use GitHub. Azure DevOps provides connectors for connecting to both these systems.
Connect to Azure from Azure DevOps
You can create an App Registration and an associated Service Principal in Azure to delegate management responsibilities to an external system (in this case, Azure DevOps). You can learn more about these objects from Microsoft’s documentation, here.
In the Azure portal, search for and select “App Registrations.” Create a “New Registration”.

For an App Registration, specify a name for your application and specify the scope of use for this application.

This process yields a Application (client) ID . Also make a note of the Tenant ID as you’ll need access to both these, later.

While here, also create a Client Secret that will serve as a password of sorts for your Azure DevOps service connection which you’ll create shortly to establish your connection to Azure.

Create the Service Principal
The second part of this process is to create a Service Principal that will have the necessary delegated permissions to create, update and delete resources in Azure. Go to your Azure Subscription and add a “Role Assignment” with “contributor” access to this App Registration. You can also limit the scope to a specific Resource Group, if you choose to.

While on this screen, also note down your Subscription ID and Subscription name, as you’ll need these later.


Create a Service Connection in Azure DevOps
You’ve completed the work on the Azure side and have collected the necessary parameters to create a Service Connection, on the Azure DevOps side. Create a connection of type “Azure Resource Manager” using a “service principal”.

Next, let’s create a Variable Group and setup four variables that Terraform will reference to connect to Azure to create and manage resources programmatically.

Managing Tfstate in Azure
In our previous episode, you may have noticed that when you executed the Terraform commands locally, Terraform generated a few artifacts, one of which is .tfstate. That’s how Terraform keeps track of the state of an environment and the resources within it. As we move Terraform to Azure DevOps, we need another location to store these artifacts. We can do that by creating a Storage Account in Azure.

Setup Azure Pipeline
By convention, we can create an azure-pipelines.yml file in the root level of our repository which has special meaning for Azure DevOps. It will execute the pipeline defined within it. Here’s an example pipeline file that I’ve created.
trigger:
- main

stages:
- stage: Provision
  displayName: 'Provision Infrastructure via Terraform'
  jobs:
  - job: Provision
    displayName: 'Provisioning Resource Group'
    pool:
      vmImage: 'ubuntu-latest'
    variables:
    - group: TerraformCredentials
    steps:
    - script: |
        set -e

        terraform init -input=false
        terraform apply -input=false -auto-approve
      name: 'RunTerraform'
      displayName: 'Run Terraform'
      env:
        ARM_CLIENT_ID: $(ARM_CLIENT_ID)
        ARM_CLIENT_SECRET: $(ARM_CLIENT_SECRET)
        ARM_TENANT_ID: $(ARM_TENANT_ID)
        ARM_SUBSCRIPTION_ID: $(ARM_SUBSCRIPTION_ID)

- stage: Build
  displayName: Build Web
  dependsOn: Provision
  jobs:
  - job: 'build_ui'
    pool:
      vmImage: 'ubuntu-latest'

    steps:
    - task: CopyFiles@2
      inputs:
        SourceFolder: web
        TargetFolder: '$(Build.ArtifactStagingDirectory)'

    - task: PublishBuildArtifacts@1
      inputs:
        PathtoPublish: $(Build.ArtifactStagingDirectory)
        ArtifactName: 'WebApp'
You can learn more about the definition of this file from Microsoft’s documentation, here.
For the purposes of this tutorial, I’ll provide a high-level overview of what this file’s setup to do.
- It will trigger on any pushes to the
mainbranch. - It has two stages: 1) Provision your environment using Terraform and 2) A simple build example that sets up some deployment artifacts for a deployment. That second stage is not really relevant to this tutorial but simply a placeholder to show that you can have multiple stages in your process to build and release, after you have provision your resources using Terraform.
- You’ll see it referencing the
TerraformCredentialsvariable group that we created earlier. It references those at execution time to pull the secrets necessary. You’ll see the actual secrets being referenced later in the file. - You’ll see the
terraform initandterraform applycommands that we learned, last week. The pipelines run those same commands in an automated fashion.
Try it Out
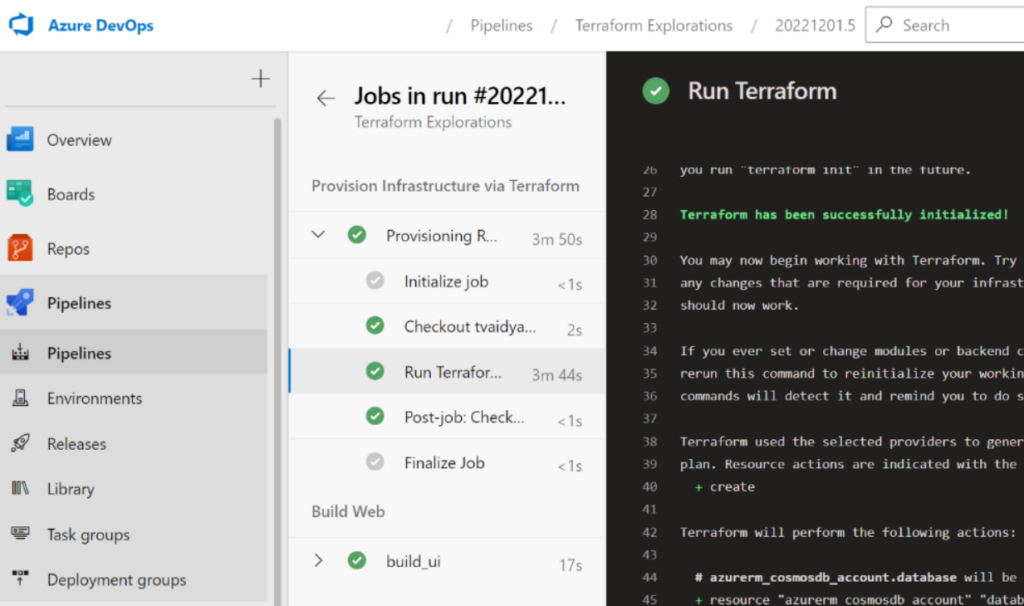
Trigger this Azure DevOps pipeline by making any innocuous change in the repository. If all goes well, you’ll see the pipeline kickoff. Dig into the details of Stage 1 and you should see logs generated by Terraform while doing its work.

Also, log in to Azure Portal and see the new resources that Terraform generated for you.
Closing Thoughts
Terraform provides a solid option for Infrastructure as Code (IaC) deployments. Not only do they provide integration with Azure Devops, they provide integrations for a lot of the big and even some of the lesser known providers in the industry, today. Check them out to see if they support your specific setup.
